How to Open a Port on Your Router
Since all routers are different, the best method is to find your router's model number and do an internet search for How to open a port on [your router model]. That being said, these are the basic steps to open a port on any router.
-
Find your router's login username and password. These are usually printed on a label
somewhere on the router. If not, locate your router's model number and do an internet
search for [your router model] default password. If the password has
been changed, you may have to do a factory reset (typically by inserting a paperclip
in a small hole on the router and holding it for 30 seconds while the router powers on)
-
Next, find your Router's IP address.
Windows users:
- Hold down the Windows key and Press 'R' to open the "Run" box.
- In the Run box, type cmd and press Enter. A black command line window will open.
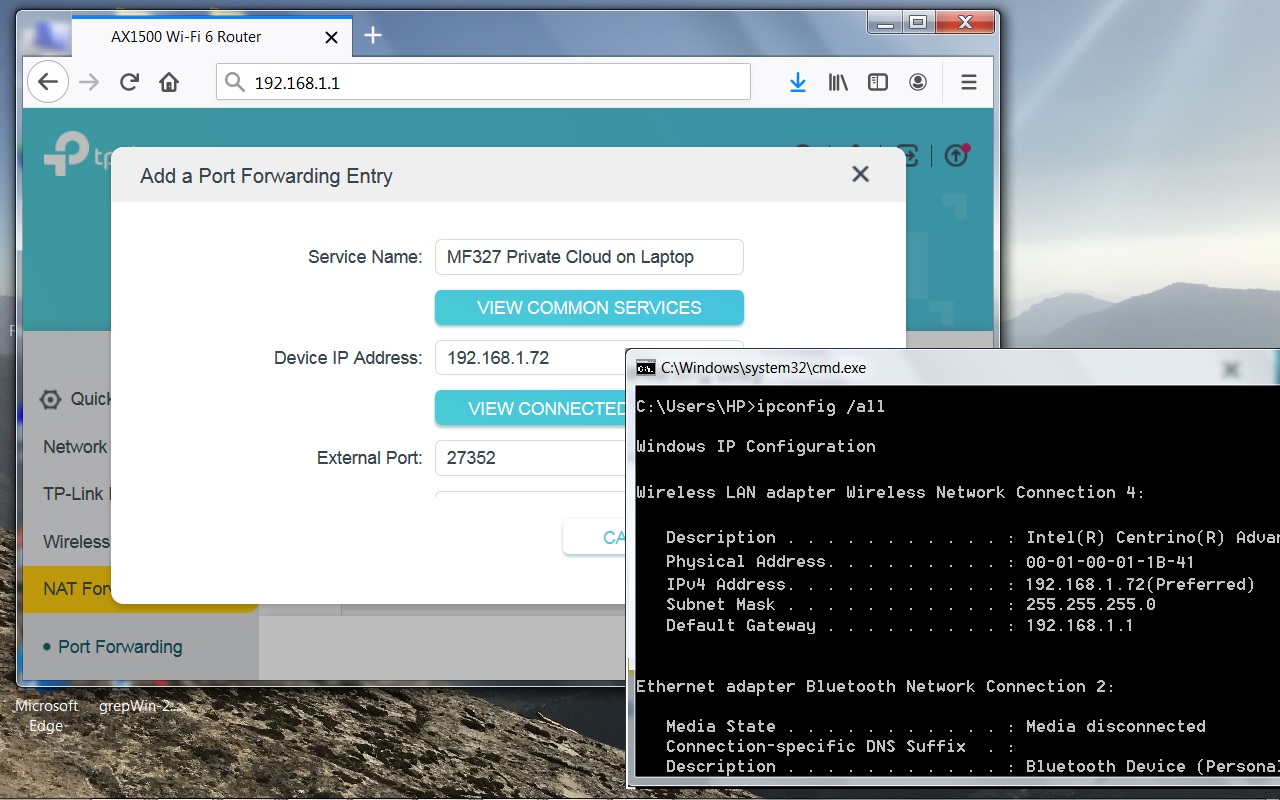
- In this window, type ipconfig /all and press Enter. Scroll up until you see the numbers 192.168. on the right side.
-
Write down the following information from this section:
| Physical Address | (This is your PC's MAC address) |
| IPv4 Address | (This is your PC's IP address) |
| Default Gateway | (This is your Router's IP address) |
Mac users:
- Open System Preferences from the Apple menu and click Network.
- Select your network connection (Wi-Fi or Ethernet) on the left, then click Advanced in the lower right.
- Your MAC address will be at the bottom of the Wi-Fi or Hardware tab. Your PC and Router's IP addresses are on the TCP/IP tab.
- Open a web browser, type your Router's IP address into the address bar and press Enter. This should open your Router's login page.
- Login with the username and password from Step 1.
-
Using the table below, find your router's Port Forwarding section.
(If you can't find it,
do an internet search for How to open a port on [your router model].)
Table 1
| Router | Port Forwarding Section |
|---|
| Arris |
[Advanced > Forwarding] or [Firewall > NAT/Gaming > Custom Service] |
| Asus |
Advanced Settings > WAN > Port Forwarding List |
| AT&T |
Settings > Firewall > Applications, NAT/Gaming > Pinholes and DMZ |
| Belkin |
Firewall > Virtual Servers |
| D-Link |
Advanced > Port Forwarding > Check box to Enable |
| Dovado |
LAN > Port Forwarding |
| DrayTek |
NAT > Port Redirection > Click first empty line number |
| Eero |
Eero App > Menu > Network Settings > Advanced Settings > Reservations & Port Forwarding > Add a Reservation > (Select your Device) > Open a Port |
| Google |
Google Home/Wifi App > Wifi > Settings > Advanced Networking > Port management > Create new port management rules > IPv4 |
| Linksys |
Applications & Gaming > Port Range Forwarding |
| Netgear |
Advanced > Advanced Setup > Port Forwarding / Port Triggering |
| TP-Link |
[Forwarding > Virtual Servers] or [Advanced > NAT Forwarding > Port Forwarding] |
| Verizon FIOS |
Firewall > Port Forwarding > Application To Forward > Custom Ports > Advanced |
-
Once at the Port Forwarding section, add a new custom port mapping:
- Enter your PC's IP address
-
Enter the Port number of the software you want to access.
(Enter the same number in all Port boxes)
- If asked to select a Protocol, choose TCP and UDP (Both)
- Give a name to this port mapping ("Laptop Remote Access", for example)
- Enable it, if necessary
- Click Apply
-
To be sure this continues working after you disconnect from the network, you'll want to assign your PC a permanent IP Address in the router. To do this, find the section for IP Reservation (see table below)
Table 2
| Router | IP Reservation Section |
|---|
| Arris |
[LAN Setup > Fixed DHCP Clients or Reserved IP Client] or [Basic > DHCP > Reserve IP Address] |
| Asus |
LAN > DHCP Server > Enable Manual Assignment = Yes |
| AT&T |
Home Network > IP Allocation > Allocate |
| Belkin |
(Not Supported / Automatic) |
| D-Link |
Setup > Network Settings > Add DHCP Reservation > Enable |
| Dovado |
LAN > DHCP > Static Address Assignment |
| DrayTek |
LAN > Bind IP to MAC > Enable |
| Eero |
Eero App > Menu > Network Settings > Advanced Settings > Reservations & Port Forwarding > Add a Reservation > (Select your Device) > IP Address |
| Google |
Google Home/Wifi App > Wifi > Settings > Advanced Networking > DHCP IP reservations |
| Linksys |
[Network Setup > Enable DHCP Server > DHCP Reservation] or [Configuration > Connectivity > Local Network > (Find Device) > Address Assignment > Choose an Address] |
| Netgear |
ADVANCED > (Setup) > LAN Setup > Address Reservation |
| TP-Link |
[DHCP > Address Reservation] or [Advanced > Network > DHCP Server > Address Reservation] |
| Verizon FIOS |
Advanced > Routing > IP Address Distribution > Connection list > (Find Device) > Edit > Check Static Lease Type |
-
Once at the IP Reservation section:
- Enter your PC's MAC address
(or select your PC from the list of connected devices, if available)
- Type in your PC's IP Address
- Click Apply
| *Note: | If you have more than one router between your PC and the internet, make sure the router(s) closest to the internet are set to Bridge Mode (see your router's instructions for how to do this). |
